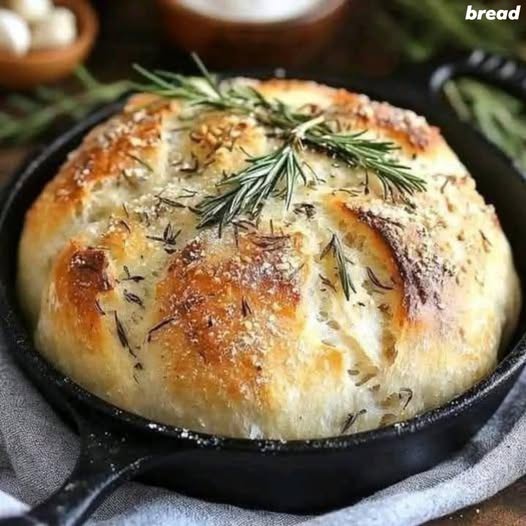
No-Knead Rosemary Artisan Bread
Description
No-Knead Rosemary Artisan Bread is a rustic, crusty homemade loaf with a beautifully crisp golden crust and a soft, airy interior. Fresh rosemary adds a fragrant, savory flavor that makes this bread especially delicious with soups, pasta, roasted vegetables, cheese, or simply warm with butter and olive oil.
The best part? There is no kneading required. A long, slow rise develops the dough’s flavor and texture while requiring very little hands-on work.
Prep Time: 15 minutes
Rise Time: 12–18 hours
Bake Time: 40–45 minutes
Total Time: About 13–19 hours
Servings: 10–12 slices
Difficulty: Easy
Ingredients
- 3 cups (375 g) all-purpose flour or bread flour
- 1½ teaspoons salt
- 1 teaspoon instant or active dry yeast
- 1½ tablespoons fresh rosemary, finely chopped
- 1½ cups (360 ml) warm water
- 1 tablespoon olive oil
- 1 teaspoon honey or sugar, optional
- Extra flour, for shaping
Equipment
- Large mixing bowl
- Wooden spoon or spatula
- Kitchen towel or plastic wrap
- Dutch oven with lid, preferably 4–6 quarts
- Parchment paper
- Wire cooling rack
Instructions
1. Mix the Dough
In a large bowl, whisk together the flour, salt, yeast, and chopped rosemary.
Add the warm water and olive oil. If using honey or sugar, add it as well.
Stir with a wooden spoon until all the flour is moistened and a shaggy, sticky dough forms. Do not knead.
2. Let the Dough Rise
Cover the bowl tightly with plastic wrap or a kitchen towel.
Let the dough rest at room temperature for 12–18 hours. The dough should become noticeably larger, bubbly, and airy.
For the best flavor, a longer fermentation is ideal.
3. Shape the Loaf
Lightly flour a work surface.
Turn the dough onto the surface and gently fold the edges toward the center several times to form a loose round loaf. Avoid adding too much flour—the dough should remain soft and slightly sticky.
Place the dough seam-side down on parchment paper.
Cover loosely and let it rest for another 30–45 minutes.
4. Preheat the Dutch Oven
About 30 minutes before baking, place the Dutch oven and its lid in the oven.
Preheat the oven to 450°F (230°C).
The preheated Dutch oven helps create the steam needed for a crisp artisan-style crust.
5. Bake
Carefully remove the hot Dutch oven.
Using the parchment paper as a sling, transfer the dough into the Dutch oven.
Optional: Use a sharp knife or bread lame to make a shallow slash across the top.
Cover with the lid and bake for 30 minutes.
Remove the lid and continue baking for another 10–15 minutes, or until the bread is deeply golden brown and crisp.
6. Cool
Carefully remove the bread from the Dutch oven and place it on a wire rack.
Allow it to cool for at least 1 hour before slicing.
This cooling time allows the interior to finish setting and helps prevent a gummy texture.
Serving Suggestions
Serve this rosemary bread:
- Warm with butter
- With extra-virgin olive oil and balsamic vinegar
- Alongside soups and stews
- With pasta dishes
- With roasted chicken or vegetables
- As a sandwich bread
- With cheese and olives
- Toasted for bruschetta
- With scrambled or poached eggs
Recipe Notes
- Fresh rosemary provides the strongest aroma and flavor, but dried rosemary can be used if necessary.
- The dough should be sticky and shaggy. Resist the temptation to add lots of flour.
- A long rise is what gives this bread its characteristic artisan flavor without kneading.
- Room temperature affects rising time. A cool kitchen may require more time, while a warm kitchen may require less.
- The Dutch oven should be thoroughly preheated for the best crust.
- Do not slice the loaf immediately after baking. The interior needs time to set.
- For a more pronounced rosemary flavor, sprinkle a little additional chopped rosemary over the loaf before baking.
Helpful Tips
For a Crispier Crust
Bake uncovered for the final 10–15 minutes. You can also leave the finished loaf on the oven rack for a few additional minutes after turning the oven off.
For a Softer Crust
Cover the bread with a clean kitchen towel while it cools.
If the Dough Is Too Sticky
Wet or lightly oil your hands rather than adding large amounts of flour. Too much flour can make the finished bread dense.
If the Dough Has Not Risen Enough
Give it additional time. Yeast activity depends heavily on room temperature.
For Extra Flavor
Let the dough ferment for closer to 18 hours and use fresh rosemary.
To Make a More Rustic Loaf
Dust the top lightly with flour before scoring and baking.
Storage
Store cooled bread at room temperature in a paper bag or loosely wrapped kitchen towel for up to 2 days.
For longer storage, slice the bread and freeze it in an airtight freezer-safe bag for up to 2–3 months.
Estimated Nutritional Information
Per serving, assuming 12 slices:
- Calories: ~135 kcal
- Carbohydrates: ~25 g
- Protein: ~4 g
- Fat: ~2 g
- Saturated Fat: ~0.3 g
- Fiber: ~1 g
- Sugar: ~0.5 g
- Sodium: ~290 mg
Nutrition is an estimate and can vary depending on the flour, amount of salt, olive oil, and serving size used.
Benefits
1. No Kneading Required
This recipe is convenient for beginners because the long fermentation develops the dough without traditional kneading.
2. Simple Ingredients
The recipe uses basic pantry staples and fresh rosemary for flavor.
3. Homemade Alternative
Making bread at home allows you to control the amount of salt, oil, and other ingredients.
4. Rosemary Adds Flavor
Rosemary contributes a strong herbal aroma and allows you to create a flavorful loaf without relying on large amounts of added ingredients.
5. Long Fermentation
The extended fermentation develops a deeper, more complex flavor and helps create the characteristic open texture of artisan bread.
Frequently Asked Questions
Can I use dried rosemary?
Yes. Replace the fresh rosemary with approximately 1½ teaspoons dried rosemary. Crush it slightly between your fingers before adding it.
Can I make this bread without a Dutch oven?
Yes. A Dutch oven gives the best results because it traps steam, but you can bake the loaf on a preheated baking sheet or pizza stone. Adding steam to the oven during the first part of baking can help create a crisp crust.
Can I let the dough rise longer than 18 hours?
Yes, but the dough may eventually become over-fermented and lose strength. If your kitchen is warm, use a shorter rise or move the dough to the refrigerator.
Why is my dough so sticky?
No-knead dough is naturally wet and sticky. This helps produce a lighter, more open crumb. Use lightly floured or wet hands when handling it.
Why did my bread turn out dense?
Possible causes include inactive yeast, insufficient rising time, very cold water, too much flour, or handling the dough too aggressively.
Can I use whole-wheat flour?
Yes. For a lighter loaf, start by replacing about 25–30% of the white flour with whole-wheat flour. You may need a little additional water.
Can I add garlic?
Absolutely. Add 1–2 finely minced garlic cloves to the dough for a rosemary-garlic variation.
Can I add cheese?
Yes. Add approximately ½–1 cup grated Parmesan, cheddar, or shredded mozzarella. Make sure the cheese does not make the dough excessively wet.
How do I know when the bread is done?
The loaf should have a deep golden-brown crust and sound hollow when tapped on the bottom. For a more precise check, the center should generally reach about 200–210°F (93–99°C).
How should I reheat the bread?
For the best texture, warm slices in a toaster or heat the whole loaf in a 350°F (175°C) oven for about 10 minutes.
Chef’s Tip
For the most flavorful loaf, mix the dough in the evening, let it rise overnight, shape it the next morning, and bake it fresh. The combination of long fermentation + fresh rosemary + a very hot Dutch oven produces an exceptionally fragrant crusty loaf with minimal effort.