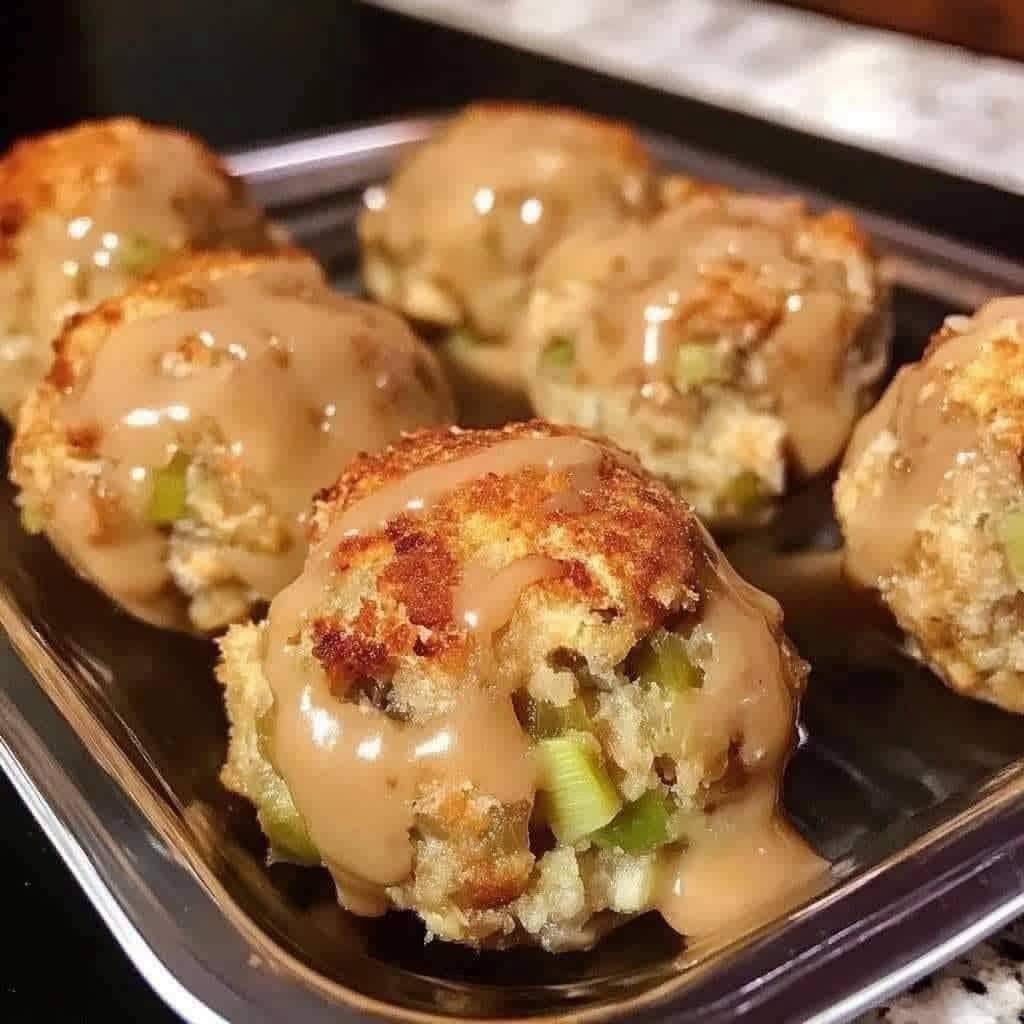
Crispy Stuffing Balls with Creamy Gravy
Golden and crispy on the outside and tender, savoury, and herb-filled on the inside, these Crispy Stuffing Balls are served with a rich, creamy homemade gravy. They’re a delicious twist on traditional stuffing and make an impressive side dish for holidays, family dinners, or cosy comfort-food meals.
Description
Crispy Stuffing Balls with Creamy Gravy turn classic stuffing into individual golden bites that are wonderfully crisp on the outside while remaining soft and flavourful in the centre.
Instead of serving stuffing from a large casserole dish, the mixture is shaped into small balls and baked until beautifully browned. The individual portions create more crispy edges, making every bite especially satisfying.
The stuffing mixture combines toasted bread, sautéed onion and celery, fragrant herbs, butter, broth, and fresh parsley. Once shaped, the balls are baked until golden brown and crisp.
The creamy gravy is prepared separately using butter, flour, broth, and cream. It is smooth, savoury, and rich enough to complement the crispy stuffing without overwhelming its herbaceous flavour.
These stuffing balls are perfect for Thanksgiving, Christmas, Sunday dinner, or whenever you’re craving a comforting homemade side dish.
Ingredients
For the Stuffing Balls
6 cups cubed day-old bread
4 tablespoons unsalted butter
1 medium onion, finely chopped
2 celery stalks, finely diced
2 cloves garlic, minced
1 teaspoon dried sage
1 teaspoon dried thyme
1/2 teaspoon dried rosemary
1/2 teaspoon salt
1/4 teaspoon freshly ground black pepper
2 cups chicken or vegetable broth
1 large egg, beaten
2 tablespoons fresh parsley, chopped
For the Creamy Gravy
3 tablespoons unsalted butter
3 tablespoons all-purpose flour
2 cups chicken or vegetable broth
1/2 cup heavy cream
1/2 teaspoon dried thyme
1/4 teaspoon black pepper
Salt, to taste
Optional Garnishes
Fresh parsley
Fresh thyme
Black pepper
Grated Parmesan
A drizzle of gravy
Servings
Makes: Approximately 16 stuffing balls
Serves: 6–8 as a side dish
Preparation Time
Prep Time: 25 minutes
Cook Time: 30–35 minutes
Total Time: Approximately 1 hour
Instructions
Step 1: Prepare the Bread
Preheat the oven to 375°F (190°C).
Spread the cubed bread evenly on a large baking sheet.
If the bread is already very dry, you can use it as-is.
If it is fresh, toast it in the oven for approximately 8–10 minutes, stirring once halfway through.
The bread should feel dry and lightly crisp but should not become deeply browned.
Remove from the oven and set aside.
Step 2: Sauté the Vegetables
Melt 4 tablespoons of butter in a large skillet over medium heat.
Add the chopped onion and celery.
Cook for approximately 5–7 minutes, stirring occasionally, until the vegetables soften.
Add the minced garlic and cook for another 30–60 seconds.
Step 3: Add the Herbs
Add the sage, thyme, rosemary, salt, and black pepper.
Stir well and cook for about 30 seconds.
Heating the herbs briefly helps release their aroma and flavour.
Remove the skillet from the heat.
Step 4: Combine the Stuffing
Place the toasted bread cubes in a large mixing bowl.
Pour the sautéed vegetable and herb mixture over the bread.
Toss gently to distribute everything evenly.
Add the chopped fresh parsley.
Step 5: Add the Broth
Gradually pour the broth over the bread mixture while gently tossing.
Don’t add all the broth at once.
The bread should become moist but should not be completely soggy.
Depending on the type and dryness of your bread, you may not need every drop of broth.
Step 6: Add the Egg
Allow the stuffing mixture to cool slightly.
Add the beaten egg and gently mix until evenly incorporated.
The egg acts as a binder and helps the stuffing balls hold their shape during baking.
Step 7: Form the Stuffing Balls
Line a large baking sheet with parchment paper.
Using your hands or a cookie scoop, portion the mixture into approximately 16 equal balls.
Each ball should be about the size of a golf ball.
Gently press the mixture together so it holds its shape, but don’t compact it excessively.
Place the balls on the prepared baking sheet, leaving a little space between each one.
Step 8: Bake
Bake the stuffing balls for approximately 25–30 minutes.
After about 15 minutes, carefully turn them over so they brown evenly.
Continue baking until the outside is golden brown and crisp.
For extra crispiness, lightly brush the tops with melted butter before baking.
Prepare the Creamy Gravy
Step 9: Make the Roux
While the stuffing balls bake, melt 3 tablespoons butter in a saucepan over medium heat.
Once melted, whisk in the flour.
Cook for approximately 1–2 minutes, whisking constantly.
The flour should lose its raw taste but should not become dark brown.
Step 10: Add the Broth
Slowly pour in the broth while whisking continuously.
Adding the broth gradually helps prevent lumps.
Continue whisking until the mixture becomes smooth.
Step 11: Add Cream
Pour in the heavy cream.
Add thyme and black pepper.
Reduce the heat to medium-low and simmer for approximately 4–6 minutes, stirring frequently.
The gravy should gradually thicken and become creamy.
Step 12: Season
Taste the gravy.
Add salt as needed.
If the gravy becomes too thick, add a small amount of broth until it reaches your preferred consistency.
Step 13: Serve
Transfer the crispy stuffing balls to a serving platter.
Pour some creamy gravy over the top or serve the gravy separately for dipping.
Garnish with fresh parsley or thyme.
Serve warm.
Notes
Use day-old bread.
Slightly stale bread works best because it absorbs the broth without immediately becoming mushy.
If using fresh bread, toast it first.
Don’t Oversoak the Bread
Add the broth gradually.
The stuffing mixture should be moist enough to hold together but not wet.
Let the Mixture Cool
Allow the sautéed vegetables to cool slightly before adding the egg.
This prevents the egg from scrambling.
Don’t Pack the Balls Too Tightly
Gently shape the stuffing into balls.
Over-compressing them can result in dense stuffing balls rather than light, tender centres.
Use Homemade or Store-Bought Broth
Either works.
If using store-bought broth, choose low-sodium broth if possible so you have better control over the final seasoning.
Helpful Tips for Extra-Crispy Stuffing Balls
1. Use a Dry Bread
The drier the bread, the better it will absorb the flavourful broth.
2. Don’t Crowd the Baking Sheet
Leave space between the stuffing balls so hot air can circulate around them.
3. Turn Them Halfway
Turning the balls during baking helps create an evenly crisp exterior.
4. Brush With Butter
A light coating of melted butter before baking helps the outside become beautifully golden.
5. Use a Cookie Scoop
A cookie scoop makes it easy to create evenly sized stuffing balls.
Uniform pieces cook at the same rate.
6. Serve Immediately
The stuffing balls are crispiest when served directly from the oven.
If they sit in gravy for too long, the exterior will naturally soften.
Variations
Sausage Stuffing Balls
Add approximately 1/2 pound cooked and crumbled breakfast sausage or Italian sausage to the stuffing mixture.
Make sure the sausage is fully cooked before combining it with the other ingredients.
Cranberry Stuffing Balls
Add 1/3 cup dried cranberries for a sweet and savoury holiday variation.
Apple and Herb Stuffing Balls
Add 1 small diced apple along with the sautéed onion and celery.
The apple adds subtle sweetness.
Mushroom Stuffing Balls
Sauté 1 cup finely chopped mushrooms with the onions and celery.
Mushrooms add wonderful savoury flavour.
Parmesan Stuffing Balls
Add 1/3 cup grated Parmesan to the stuffing mixture before shaping.
You can also sprinkle Parmesan over the balls before baking.
Vegetarian Stuffing Balls
Use vegetable broth instead of chicken broth.
For vegetarian diets, make sure your bread and other ingredients meet your dietary requirements.
Serving Suggestions
These stuffing balls pair beautifully with:
Roast chicken
Roast turkey
Baked ham
Roast beef
Mashed potatoes
Green beans
Roasted carrots
Brussels sprouts
Cranberry sauce
Roasted vegetables
Garden salad
They are particularly delicious as part of a holiday dinner spread.
Storage
Store leftover stuffing balls in an airtight container in the refrigerator for up to 3–4 days.
Store the gravy separately if possible.
To reheat the stuffing balls, place them in a 375°F (190°C) oven for approximately 8–12 minutes.
An air fryer also works very well and can help restore their crispy exterior.
Reheat the gravy gently in a saucepan, adding a splash of broth if it has become too thick.
Nutritional Information
Approximate nutrition per serving, assuming 8 servings and including a moderate amount of gravy:
Calories: Approximately 320–360
Protein: Approximately 7–9 g
Carbohydrates: Approximately 38–43 g
Fat: Approximately 16–19 g
Fiber: Approximately 2–3 g
Sugar: Approximately 3–4 g
Sodium: Approximately 500–700 mg
Nutrition varies according to the bread, broth, butter, cream, and serving size used.
Adding sausage, cheese, or additional gravy will increase the calorie and fat content.
Benefits
Provides Energy
Bread provides carbohydrates that serve as an important source of energy.
Herbs Add Flavor Without Much Sodium
Sage, thyme, rosemary, parsley, and black pepper provide plenty of flavour without requiring excessive salt.
Customizable
The recipe can be adapted with vegetables, mushrooms, sausage, apples, cranberries, or cheese.
Portion-Friendly
Individual stuffing balls make it easy to control portions and ensure everyone gets a crispy piece.
Homemade Ingredient Control
Making stuffing from scratch allows you to control the amount of butter, salt, broth, and cream used.
Note: This is a comfort-food recipe rather than a low-calorie dish. It can be enjoyed as part of a balanced meal alongside vegetables and lean protein.
Frequently Asked Questions
1. Can I make these stuffing balls ahead of time?
Yes. Prepare and shape the stuffing balls up to one day ahead.
Cover and refrigerate them until ready to bake.
2. Can I freeze stuffing balls?
Yes. Shape the uncooked stuffing balls and freeze them on a baking sheet. Once frozen, transfer them to a freezer-safe container.
Bake from frozen, adding additional cooking time as needed.
3. Why are my stuffing balls falling apart?
The mixture may need more moisture or binding.
Add a little additional broth or another beaten egg if necessary.
Also make sure you are gently pressing the balls together when shaping them.
4. Why are my stuffing balls soggy?
Too much broth is usually the cause.
Add the broth gradually and stop once the bread is moist but not saturated.
5. How can I make them crispier?
Use dry bread, avoid overcrowding the pan, brush the balls lightly with melted butter, and bake until deeply golden.
An air fryer can also produce an especially crisp exterior.
6. Can I use boxed stuffing mix?
Yes. You can use prepared stuffing mix as a shortcut, although homemade bread cubes provide more control over texture and flavour.
7. Can I use gluten-free bread?
Yes. Substitute your favourite gluten-free bread and make sure the other packaged ingredients are also gluten-free if necessary.
8. Can I make the gravy without heavy cream?
Yes. Replace the heavy cream with milk or half-and-half for a lighter gravy.
You can also omit the cream and make a traditional broth-based gravy.
9. Can I use turkey broth?
Absolutely. Turkey broth is an excellent choice, especially for Thanksgiving leftovers.
10. Can I add cheese?
Yes. Parmesan, Gruyère, or cheddar can add delicious savoury flavour.
11. Can I cook these in an air fryer?
Yes. Air frying at approximately 375°F (190°C) until golden and crisp works very well. Cooking time will vary depending on the size of the balls and your air fryer.
12. How do I keep the stuffing balls crispy when serving?
Keep them on a warm baking sheet or serving platter and serve the gravy separately.
Adding gravy directly over the balls will gradually soften their crispy exterior.
Recipe at a Glance
Recipe: Crispy Stuffing Balls with Creamy Gravy
Makes: 16 stuffing balls
Serves: 6–8
Prep Time: 25 minutes
Cook Time: 30–35 minutes
Total Time: About 1 hour
Difficulty: Easy to Moderate
Final Thoughts
Crispy Stuffing Balls with Creamy Gravy are a fun and delicious way to transform classic stuffing into something extra special. Each ball develops a golden, crispy exterior while staying soft and savoury inside, packed with herbs, onion, celery, and buttery flavour.
The creamy gravy adds another layer of comfort and makes every bite rich and satisfying. For the best results, use day-old bread, add broth gradually, avoid over-compressing the stuffing balls, and bake them until deeply golden.
Whether you’re preparing a holiday feast, Sunday dinner, or simply craving comforting homemade food, these stuffing balls are guaranteed to be a crowd-pleaser.